This post is part of the series "Linux Playground From Scratch"
- Virtual Debian: A Practical Step-by-Step Guide From Scratch
- Alpine in QEMU: A Practical Guide From Scratch
- VirtualBox: Running Pre-Built Debian and Alpine Images
- Installing Debian in VirtualBox: A Step-by-Step Guide
- Termux: Your Pocket-Sized Linux on Android
- Essential Command-Line Tools for Linux: A Practical Guide
So far, in previous posts, we have covered how to install and set up Debian and Alpine as Guest Operating Systems running in a Virtual Machine and also Termux running in Android. In this post, we're going to review how to install some tools that might be useful to ease our work in our playground, development, or working environment. It's worth mentioning that some tools aren't available on all systems, so I'll notify you when this happens.
NeoVim
A text editor is definitely something you will need at some point. There are many options for command-line text editors available, but we will focus on vi, specifically on neovim, an editor derived from vim, which is a clone of vi.
We're going to learn the very basics of this specific editor because the vi editor is part of the list of POSIX commands. This means that you'll almost certainly find it in any POSIX-compatible OS you have to work with (learn once, apply everywhere).
Let's start by installing neovim. Below are the commands to do it on each of the systems we have reviewed in this series; pick the one that matches your needs.
Debian
sudo apt install neovim
Alpine
sudo apk add neovim
Termux
pkg install neovim
After the installation ends, it's time to open the editor. But before anything, you need to understand a little bit about how it works. The vi editor cycles between modes; most of the time, you will be in one of the command or the insert modes. When you open the editor, you'll be in the command mode, where you'll be able to "command" the editor to do things like saving the changes, exiting, searching, search and replace, &c. On the other hand, the insert mode will let us insert (write) content into the document.
To open the editor, you will write the nvim command. If you want to edit a file, you can pass the name of the file as an argument; the command would be something like nvim /path/to/file_to_edit.txt. If you want to use the vi or vim commands to access NeoVim, you can run the command below this paragraph. Then you could write something like vi /path/to/file_to_edit.txt to edit a file.
sudo ln -fs "$(which nvim)" /usr/bin/vi \
&& sudo ln -fs "$(which nvim)" /usr/bin/vim
If you see weird characters appearing right after starting neovim, run the following command. It's a terminal emulator bug and has been described in the FAQ.
mkdir -p ~/.config/nvim \
&& echo 'set guicursor=' >> ~/.config/nvim/init.vim
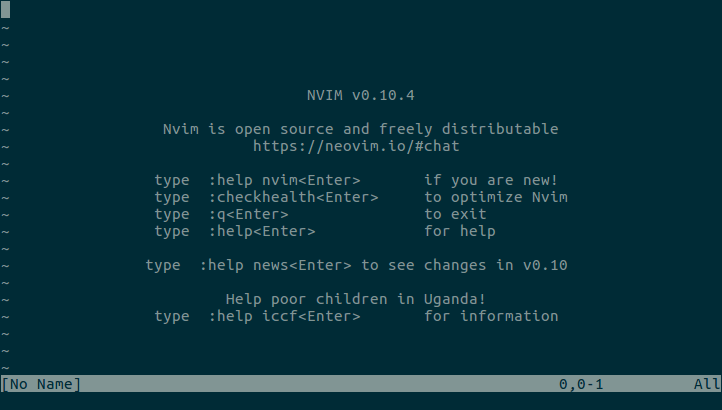
Next is an screenshot of the nvim welcome screen.
Once it is open, you'll be in the command mode, and you can switch to the insert mode by pressing the i key, where you can insert text. Once you're done inserting text into the document, you can switch back to the command mode by pressing the Esc key. Of course, you can switch back to the insert mode with i, write more stuff, come again to the command mode with Esc, and continue in this loop as long as you need it.
In the command mode, you can save the changes to the file with the :w<Enter> command; the colon (:) tells the editor that you are going to write a command, and the w is for write. If you have started vi without opening a file, you'll need to tell where do you want to write the content; you can do it with the command :w /path/to/save_content.txt<Enter>.
If you want to exit, you have to write the :q<Enter> command to quit. But, if there are changes that haven't been saved, you first will need to write them (:w) or you can exit without saving the changes with the :q!<Enter> command. The exclamation mark of the command (!) tells vi to force the command ignoring any warning.
Also, you can combine multiple operations in the same command. For example, if you want to write and exit, you can do it with the command :wq<Enter>.
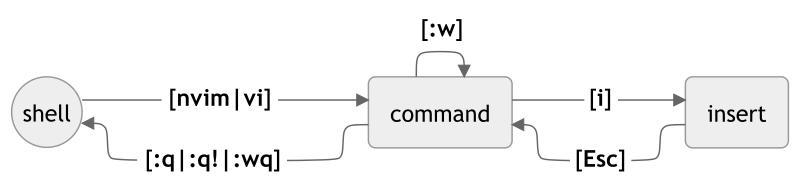
Here is a small table with the very basic things we have just learned.
| Current Mode | Command | Next Mode | Description |
|---|---|---|---|
| Shell (bash) | nvim / vi | Command | Open the VI text editor |
| Command | i | Insert | Start editing by entering the insert mode |
| Insert | Esc | Command | Stop editing and switch back to command mode |
| Command | :w | Command | Write changes |
| Command | :q | Shell (bash) | Exit from the VI editor and return to the shell |
| Command | :q! | Shell (bash) | Exit without saving any change |
| Command | :wq | Shell (bash) | Write changes and exit |
And below a diagram representing the previous table.
While nowadays (almost) all keyboards have the arrow keys and you can move around the document using them, at the time the vi editor was created the keyboard didn't have these keys and that's why the editor supports the famous hjkl keys to move around the document. It is worth knowing these keys because they have become like a de facto standard. Probably you'll see applications that support the vi mode; this means that they support vi's key combinations to move around (e.g., vimium, vscodevim, &c.).
Keep in mind that you'll use these keys to move around the document when you're in the command mode. Otherwise, if you're in the insert mode, you'll be inserting these keys in the document. Below is a table explaining the direction of each key.
| Key | Direction |
|---|---|
h | Left |
j | Down |
k | Up |
l | Right |
Now you know enough to start editing files. Once you feel comfortable with this, I suggest you, as your next step, to do the interactive tutorial Vim Tutor that you can access by following the next instructions.
NeoVim
nvim +Tutor
Also, you can access the same tutorial by typing the :Tutor command inside NeoVim.
Vim
vimtutor
And, if you want more study material, below is a list of books that you can read to improve your expertise level.
- Use Vim Like A Pro, by Tim Ottinger
- A Byte of Vim, by Swaroop C H (pdf)
- Learn Vimscript the Hard Way, by Steve Losh
- VIM User Manual
- UNIX Text Processing, by Dale Dougherty and Tim O'Reilly
- ... and more
Git
Git is a tool commonly used in software development, but its use has spread to a wider area that includes other fields. For instance, it is increasingly used in data science, design, content management, package management, among others. This is why, sooner or later, you might need it as a dependency of another tool or as an essential part of your work.
Below is the command that you need to run to install Git.
Debian
sudo apt install git
Alpine
sudo apk add git git-doc
Termux
pkg install git
Once the installation process ends, it is important to tell Git what your name and email are. These values are the minimum configuration that you'll need to set if you plan to use Git to track changes on your files.
Below is the command to set your name (update it with your real name).
git config --global user.name "Your Full Name"
And next is the command to set your email (also update it with your real email).
git config --global user.email "your@email.address"
Also, you can set NeoVim (installed in previous section) as Git's default editor with the following command.
git config --global core.editor "nvim"
That's all you need to know to get started. If you want to know a bit more about Git, typing the next command you can access a tutorial that will give you an introduction.
man gittutorial
And, if you are eager to learn more about Git, I really recommend you read the official Pro Git book, written by Scott Chacon and Ben Straub.
Docker
Docker is a tool that allows us to run containers with a simple and friendly user interface. I chose Docker because it has become the de facto standard. Anyway, keep in mind that there are other tools we can use to achieve the same tasks, like podman.
IMPORTANT: The following instructions are just for Debian. If you are using Alpine, we have already covered how to install Docker in the Install Alpine Linux post. While, if you are using Termux, we have covered how to install Docker's client application in the Termux Install post, where you can use it to interact with a Docker server running on another machine.
Let's start by installing Docker by running the next command.
Debian
sudo apt install docker.io docker-compose
Alpine
Termux
Next, we will need to set up our user so it can run Docker.
Debian
sudo usermod -aG docker $(whoami)
Alpine
Termux
You will need to log out and log in again for the assignment of the docker group to take effect.
Finally, let's run the following command to check the installation and setup.
Debian
docker run hello-world
Alpine
Termux
If everything is working fine, in the output, you should see something like below.
Unable to find image 'hello-world:latest' locally
latest: Pulling from library/hello-world
17eec7bbc9d7: Pull complete
Digest: sha256:54e66cc1dd1fcb1c3c58bd8017914dbed8701e2d8c74d9262e26bd9cc1642d31
Status: Downloaded newer image for hello-world:latest

Hello from Docker!
This message shows that your installation appears to be working correctly.

To generate this message, Docker took the following steps:
 1. The Docker client contacted the Docker daemon.
 2. The Docker daemon pulled the "hello-world" image from the Docker Hub.
    (amd64)
 3. The Docker daemon created a new container from that image which runs the
    executable that produces the output you are currently reading.
 4. The Docker daemon streamed that output to the Docker client, which sent it
    to your terminal.

To try something more ambitious, you can run an Ubuntu container with:
 $ docker run -it ubuntu bash

Share images, automate workflows, and more with a free Docker ID:
 https://hub.docker.com/

For more examples and ideas, visit:
 https://docs.docker.com/get-started/
TMUX
Tmux is a Terminal Multiplexer. It allows you to create a session from which you can run several applications, detach from the session (allowing the applications to keep running in the background), and reattach to the session.
Tmux simplifies working with multiple applications simultaneously. You can switch between them with a keystroke, display them side by side, copy text from one app and paste it into another, &c. Think of it as a window manager for the terminal.
Below is the command you can use to install tmux.
Debian
sudo apt install tmux vlock
Alpine
sudo apk add tmux kbd-vlock
Termux
pkg install tmux
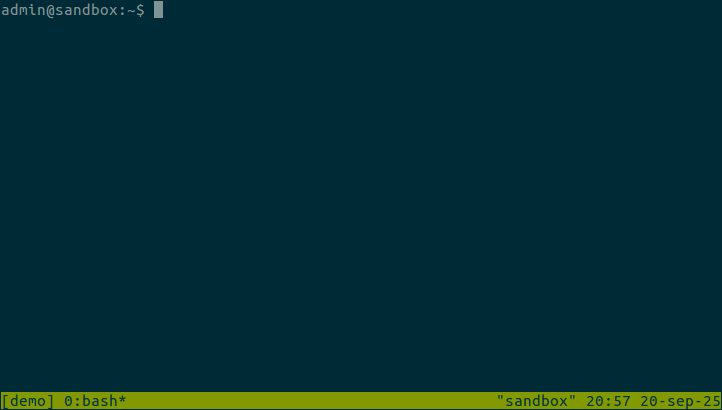
After the installation, let's see a simple example of how it works by starting a new session with the following command (demo is just an example, replace it with whatever name you prefer), where new is an alias for new-session.
tmux new -s demo
Once inside the new session, you'll see something like the next screenshot.
Let's continue by listing the current directory's content.
ls -lha
Next, we're going to detach (leave) the session. To do this, press the keystroke combination Ctrl+b d. This means pressing the Ctrl key followed by b without releasing the Ctrl key (the + sign means that both keys are pressed at the same time). Then, release both keys and press d. You can also see this keystroke combination with the C-b d notation.
Detaching the session means that it will continue running in the background. You can check this by running the following command, where ls is an alias for list-sessions.
tmux ls
Now, return to the session by running the next command, where a is an alias for attach or attach-session.
tmux a -t demo
You will see the output of the ls command that we ran previously.
Because we have only one open window, you can close the session by running the exit command. Alternatively, you can force the session to close by running the next command.
tmux kill-session -t demo
That covers the very basics of tmux. Before moving forward with the introduction, I'm going to share a simple tmux configuration that you can save in the ~/.tmux.conf file by running the following command.
cat > ~/.tmux.conf <<HEREDOC
# @file: ~/.tmux.conf
# ---------------------
# Config to mimic GNU/Screen
# https://www.gnu.org/software/screen/manual/html_node/Default-Key-Bindings.html

# Change prefix convination
unbind-key C-b
set -g prefix C-a

# Key bindings                                          # Defaults
bind-key C-c new-window                                 # c
bind-key C-n next-window                                # n
bind-key C-p previous-window                            # p
bind-key C-d detach                                     # d
bind-key A command-prompt -I "#W" "rename-window '%%'"  # ,
bind-key x lock-client
bind-key X lock-server # Uppercase

# Lock window
set -g lock-command vlock
set -g lock-after-time 0 # In seconds. 0 == never

# Set VI mode
set-window-option -g mode-keys vi

# Mouse support
# @see https://github.com/tmux/tmux/issues/140#issuecomment-474341833
set -g mouse on
unbind-key -T copy-mode-vi MouseDragEnd1Pane

# Styles (https://man.openbsd.org/tmux#STYLES)
set -g status-bg default #black
set -g status-fg default #whie
set -g status-style "bg=default fg=default"
set -g status-left "#[fg=green][#[fg=default] #S@#h #[fg=green]][#[fg=default]"
set -g status-left-length 40
set -g status-right "#[fg=green]][#[fg=default] %Y-%m-%d %H:%M #[fg=green]]#[fg=default]"
set -g status-justify centre
set -g window-status-format " #I#{?window_flags,#{window_flags}, }#W "
set -g window-status-current-format "#[bold](#I#F#W)"
HEREDOC
If you start a new session, you'll see something like the next screenshot.
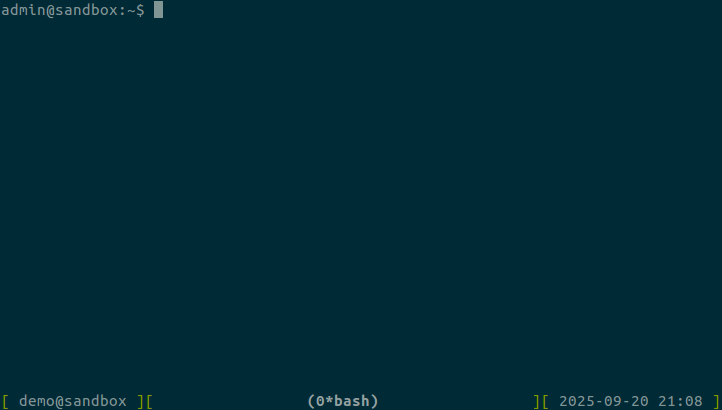
The first thing you'll notice in the previous configuration is that I've changed the default keystroke prefix combination from C-b to C-a. This is a nostalgic change, because C-a is the default keystroke prefix used by screen (another terminal multiplexer). Besides finding it easier to type, I wanted to have the same keystroke prefix on both apps.
Next, you'll see a list of key bindings explained in the following table. The bindings are case-sensitive; they won't work if a lowercase key is expected and you press the uppercase key (or vice versa).
| Keystroke Combination | Action |
|---|---|
C-a C-c | Create a new window |
C-a C-n | Move to the next window (to the right) |
C-a C-p | Move to the previous window (to the left) |
C-a C-d | Detach from current session |
C-a A | Rename current window |
C-a x | Lock current client |
C-a X | Lock server |
C-a ? | Get a list of available keystroke combinations (exit by pressing q) |
After the previous bindings, you'll see that VI mode is enabled. This allows you to move around using the same keys that we learned with vi (hjkl). You can use it in copy mode, explained in the next table.
| Keystroke Combination | Action |
|---|---|
C-a [ | Start copy mode |
q | Exit copy mode (without copying) |
hjkl | VI keys to move around the window (in copy mode) |
SPACE | Press the Spacebar to start the selection |
ENTER | Press the Enter key to copy the selection |
C-a ] | Paste the most recent selection that was copied |
There are many other things that you can do with tmux, but they are beyond the scope of this introduction, such as pane management, scripting, automation, plugins, and extensions. To learn more about tmux, check the following resources:
- The Tao of tmux
- The official Getting-Started wiki page
- Learn X in Y minutes (Where X=tmux)
tmux.confWith Commentary
TTYD
TTYD is a tool that allows you to share your terminal over the network. This is useful if you don't have an SSH client to access the OS, but you do have a web browser. Another scenario where it could be helpful is sharing your terminal with teammates to show your work, for pair programming, or other collaborative tasks.
Below is the command to install ttyd.
Debian
curl --location --remote-name 'https://github.com/tsl0922/ttyd/releases/download/1.7.7/ttyd.i686' \
&& chmod a+x ttyd.i686 \
&& sudo mv ttyd.i686 /usr/bin/ttyd
Alpine
sudo apk add ttyd
Termux
pkg install ttyd
If you've installed ttyd in a virtual machine with a NAT network, remember to expose the port you'll use to access the service from the host machine.
Below is the command to start the ttyd service. This example uses port 4200, but you can change it as desired. In Alpine don't use sudo.
sudo ttyd --port 4200 --writable login
Once the service is running, you can access the terminal using your web browser by navigating to http://localhost:4200/.
As another example, you can attach to a tmux session (as shown in the previous section).
ttyd --port 4200 --writable tmux new -A -s demo
If you find the font size too small (or large), you can use the fontSize query parameter to adjust it, like this: http://localhost:4200/?fontSize=20.
For more information about using ttyd, consult the official wiki page.
Daemon
You might want ttyd to start automatically during the OS boot process. Here are the steps to automatically start the ttyd service when the system boots.
Debian
ttyd.service file, which will contain the daemon configuration, using the following command.
cat <<EOF | sudo tee /lib/systemd/system/ttyd.service
[Unit]
Description=Share terminal over the web
After=network.target

[Service]
ExecStart=/usr/bin/ttyd --port 4200 --writable login
Restart=on-failure

[Install]
WantedBy=multi-user.target
Alias=ttyd.service
EOF
Then, run the following command to reload the available daemons and enable the one we just created.
sudo systemctl daemon-reload && \
sudo systemctl enable ttyd
Now you can start the service with the command below.
sudo systemctl start ttyd
And check the service status with the subsequent command.
sudo systemctl status ttyd
Alpine
cat <<EOF | sudo tee /etc/init.d/ttyd
#!/sbin/openrc-run

name="ttyd"
command="/usr/bin/ttyd"
command_args="--port 4200 --writable login"
command_background="yes"
pidfile="/run/ttyd.pid"


depend() {
    need net
}
EOF
Then, run the command below to enable the daemon.
sudo chmod +x /etc/init.d/ttyd && \
sudo rc-update add ttyd default
Once enabled, start it with the following command.
sudo rc-service ttyd start
And check the status with the next one.
sudo rc-service ttyd status
Termux
Similar Applications
CIFS (Shared Directory)
You'll likely need to share a directory between the host OS and the guest OS. For example, you might be working on a software project with the source code on the host OS, while development happens inside the guest OS. There are different ways to share files between host and guest, but we'll review one commonly available on all most host OSs: the SMB (Server Message Block) protocol.
Below, we'll see how to mount a shared directory from the host OS within the guest OS with read and write permissions. The shared directory will be in the format //[SERVER_IP]/[SHARED_NAME]. How to share a directory using the SMB protocol, including how to share with a username and password, is outside the scope of this post, but you can find plenty of documentation online.
IMPORTANT: The following instructions are for Debian and Alpine only. Termux is excluded because it cannot mount file systems at the kernel level, which cifs-utils requires. This limitation is due to Android's security model, which restricts apps from having the root-level access needed for kernel-level operations. However, Termux can act as our host OS, and we've already covered other methods to share a directory between Termux and a guest OS (Alpine) in a previous post.
Let's start by installing the cifs utilities (and enabling netmount on Alpine's boot) with the following command.
Debian
sudo apt install cifs-utils
Alpine
sudo apk add cifs-utils \
&& sudo rc-update add netmount default
Termux
To avoid repetition, we'll create variables to reuse in the following commands. These variables will store the server IP, the shared directory name, and the target directory (mount point). Update these values to suit your needs.
SMB_IP='10.0.2.2'
SMB_NAME='host-shared'
TARGET="${HOME}/shared"
Next, create the directory where the shared directory will be mounted.
mkdir "${TARGET}"
After creating the mount point directory, mount the shared directory using the following command. The vers=1.0 parameter is needed to mount cifs with unix extensions.
sudo mount -v -t cifs -o rw,guest,uid=$(id -u),forceuid,gid=$(id -g),forcegid,vers=1.0 "//${SMB_IP}/${SMB_NAME}" "${TARGET}"
To unmount the directory, run this command.
sudo umount "${TARGET}"
Manually mounting the shared directory every time it's needed can become tedious. To mount it automatically at boot time, save these mount settings in the /etc/fstab file. Here's the command to do so.
echo "//${SMB_IP}/${SMB_NAME} ${TARGET} cifs rw,guest,uid=$(id -u),forceuid,gid=$(id -g),forcegid,nofail,vers=1.0 0 0" | sudo tee -a /etc/fstab
With the previous configuration, you can also use the mount command with just the target mount point directory. Here's the shortest version of the mount command.
sudo mount "${TARGET}"
Fetch Tools
Here, we'll pick and install one of the many fetch apps available. Fetch apps provide system information like CPU, RAM, disk, and OS details.
I chose macchina because it comes as a self-contained binary (making it easy to install) and is available for both aarch64 and x86_64 architectures.
Let's start by running the following command. It downloads the package with the binary and extracts it into the ~/.local/bin directory. Ensure this directory is included in your PATH environment variable.
CURRENTWD=$(pwd) \
&& SYSARCH='aarch64' \
&& if [ "${SYSARCH}" != $(uname -m) ]; then SYSARCH='x86_64'; fi \
&& ORIGIN="https://github.com/Macchina-CLI/macchina/releases/download/v6.4.0/macchina-v6.4.0-linux-musl-${SYSARCH}.tar.gz" \
&& TARGET="macchina.tar.gz" \
&& mkdir -p ~/.local/bin \
&& cd ~/.local/bin \
&& if [ $(which curl) ]; then curl -L -o $TARGET $ORIGIN; else wget -O $TARGET $ORIGIN; fi \
&& tar -xzf $TARGET \
&& rm $TARGET \
&& cd $CURRENTWD
Then, download and set up a theme.
CURRENTWD=$(pwd) \
&& ORIGIN='https://github.com/Macchina-CLI/macchina/raw/refs/heads/main/contrib/themes/Hydrogen.toml' \
&& mkdir -p ~/.config/macchina/themes \
&& cd ~/.config/macchina/themes \
&& if [ $(which curl) ]; then curl -LO $ORIGIN; else wget $ORIGIN; fi \
&& cd $CURRENTWD \
&& cat <<HEREDOC >> ~/.config/macchina/macchina.toml
theme = "Hydrogen"
HEREDOC
Finally, run the command below to display your system's information.
macchina
GNU Typist
I've saved GNU Typist for last, as it's entirely optional. For those who primarily use a keyboard, this tool helps learn and improve typing skills. Here's an introduction from the official page:
GNU Typist (also called gtypist) is a universal typing tutor. You can learn correct typing and improve your skills by practising its exercises on a regular basis.
IMPORTANT: At the time of writing, the package for Alpine couldn't be found.
The command to install the application is below.
Debian
sudo apt install gtypist
Alpine
Termux
pkg install gtypist
After installation, run the following command to start the lesson in Spanish (remove esp.typ for lessons in English).
gtypist esp.typ
Wrapping Up
In this post, we explored installing and setting up several applications to simplify basic terminal tasks. While there are thousands of CLI apps, you'll discover them as needed. For now, you have plenty to start experimenting. Embrace the world of terminals and keyboards!
Take care and until next time!