This post is part of the series "Linux Playground From Scratch"
- Virtual Debian: A Practical Step-by-Step Guide From Scratch
- Alpine in QEMU: A Practical Guide From Scratch
- VirtualBox: Running Pre-Built Debian and Alpine Images
- Installing Debian in VirtualBox: A Step-by-Step Guide
- Termux: Your Pocket-Sized Linux on Android
- Essential Command-Line Tools for Linux: A Practical Guide
In this guide, we'll walk through how to run a VirtualBox VM using the images created in the previous posts.
The first step is to download and install VirtualBox. These instructions are outside the scope of this article, but you'll find them in the official user guide. At the time of writing, this post uses VirtualBox version 5.2; newer versions might have a different interface.
Create a VM using the GUI
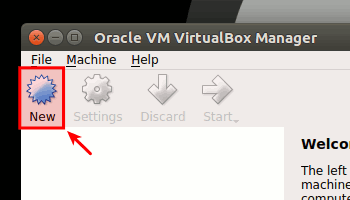
Once the VirtualBox application is installed and running, it's time to create a new VM. Click the "New" button in the main window.
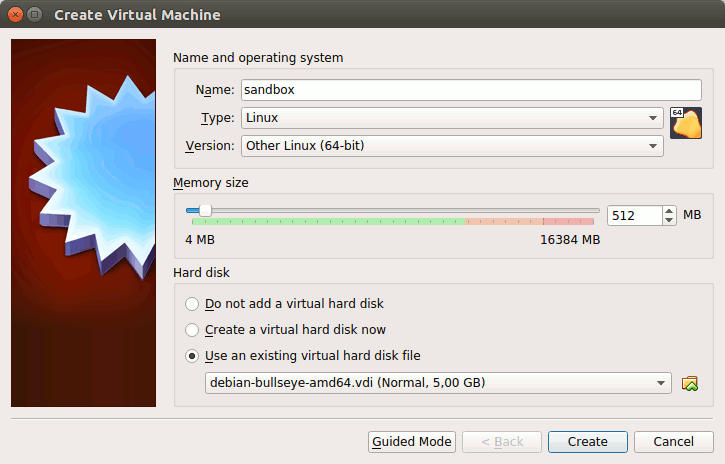
In the pop-up window, set a name for the VM (in this example, sandbox), select the Linux type, the version Other Linux (64-bit), set the memory size (512 MB is enough to start), and choose "use an existing virtual hard disk file" to select one of the .vdi files from previous posts. Here we’ll use the Debian image, but the Alpine one works the same.
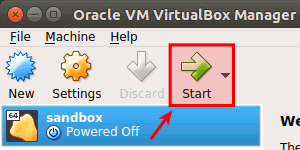
After the VM is created, click the Start button to run it.
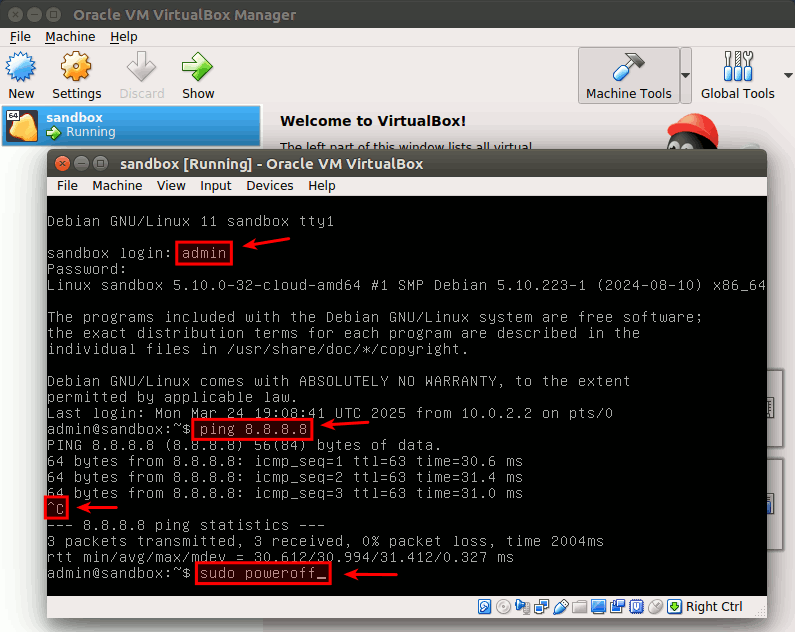
Once the VM finishes booting, log in with the user account (here, user is admin and pass is admin). After the prompt appears, use ping to test connectivity with Google Public DNS. Abort with Ctrl+c. Then power off the VM using sudo poweroff.
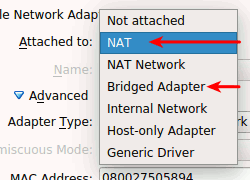
If there's no Internet access, try changing the network adapter from NAT to Bridged Adapter, or changing the adapter type. This could solve the problem since NAT shares the host's connection, while Bridged Adapter creates a direct connection to the network.
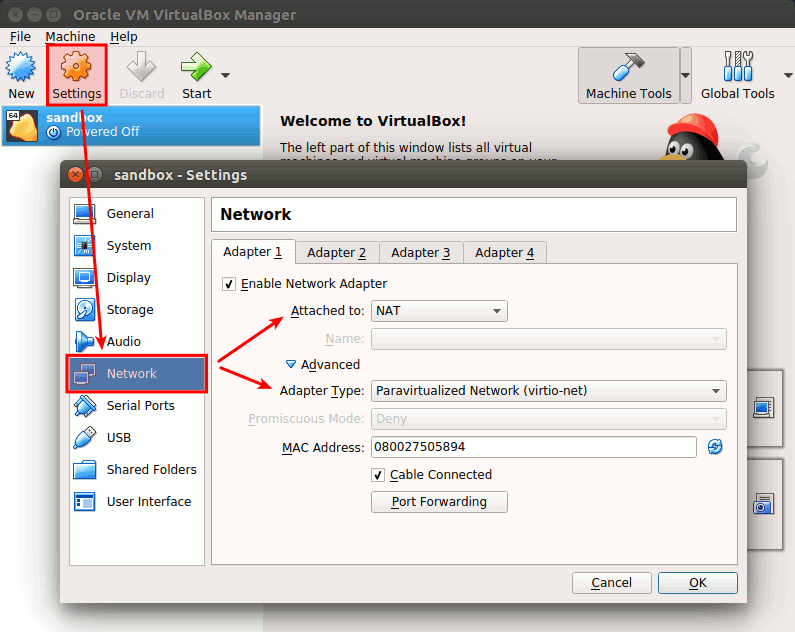
SSH Access
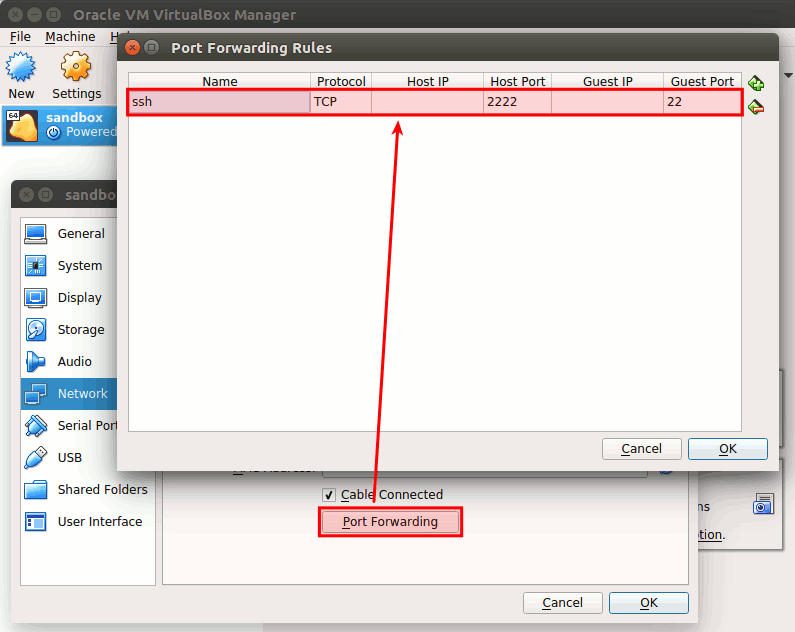
Both images (Debian and Alpine) include an SSH server, allowing remote login to the VM. This provides a better terminal experience, including copy/paste and scroll. If you're using NAT, start by forwarding port 22 to 2222 on the host.
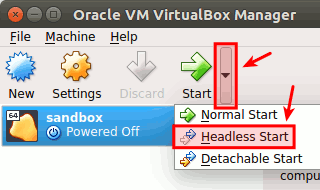
Start the VM in Headless mode to hide the window, or normally if preferred.
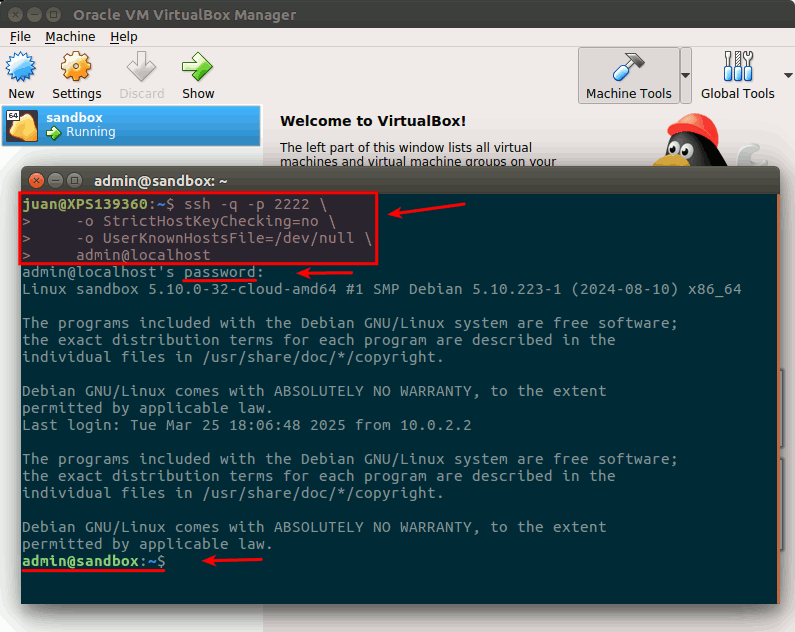
Once the VM is running, we're ready to log in using an SSH client. On Windows, PuTTY is a classic option, but Windows 10+ includes a built-in client. On Linux, use:
ssh -q -p 2222 \
    -o "StrictHostKeyChecking=no" \
    -o "UserKnownHostsFile=/dev/null" \
    admin@localhost
Create a VM using the CLI
In this section, we're going to create the same VM we did in the previous sections, but using only the CLI. The following commands assume that we're located in the directory where all the VM stuff is going to be located, including the virtual hard disk file.
Below, we're going to set the environment variables with the values that we're going to use in this section. Feel free to change these values to match your needs.
VBOX_VM_PATH="$(pwd)"
VBOX_VM_NAME="sandbox"
VBOX_HD_FILE="debian-bullseye-amd64.vdi"
VBOX_HD_NAME="${VBOX_VM_NAME} Storage Controller"
Let's start creating the VM with the following command.
VBoxManage createvm \
    --basefolder "${VBOX_VM_PATH}" \
    --name "${VBOX_VM_NAME}" \
    --ostype "Linux_64" \
    --register
Next, we have to modify some VM settings with the following command. From the list of parameters, we have ioapic to enable I/O APIC, rtcuseutc to set the hardware clock in UTC time, memory to set the VM memory (in our example, 512 MB), vram to set the video memory (in our example, 16 MB), and nic1 to configure the type of networking for the first (1) virtual network card.
What we said for the GUI version also applies here; instead of nat, we can choose bridged (or any other type). Here's the full list of options for the networking type parameter: [--nic<1-N> none|null|nat|bridged|intnet|hostonly|generic|natnetwork].
VBoxManage modifyvm "${VBOX_VM_NAME}" \
    --ioapic on \
    --rtcuseutc on \
    --memory 512 \
    --vram 16 \
    --nic1 nat
Also, we can change the networking hardware. Below is an example where we select virtio. Here's the full list of options: [--nictype<1-N> Am79C970A|Am79C973|82540EM|82543GC|82545EM|virtio].
VBoxManage modifyvm "${VBOX_VM_NAME}" --nictype1 "virtio"
Next, attach the storage controller to the VM.
VBoxManage storagectl "${VBOX_VM_NAME}" \
    --name "${VBOX_HD_NAME}" \
    --add "ide" \
    --controller "PIIX4"
Then, attach the storage medium (the virtual hard disk file) to the previous storage controller.
VBoxManage storageattach "${VBOX_VM_NAME}" \
    --storagectl "${VBOX_HD_NAME}" \
    --medium "${VBOX_VM_PATH}/${VBOX_HD_FILE}" \
    --type "hdd" \
    --port 0 \
    --device 0
With the last command, we've finished creating and setting up the VM. But, if we would like to access the running VM through an SSH connection, then we'll have to set port forwarding with the natpf1 parameter, as in the example below. Here's the parameter usage documentation: [--natpf<1-N> [<rulename>],tcp|udp,[<hostip>],<hostport>,[<guestip>],<guestport>].
VBoxManage modifyvm "${VBOX_VM_NAME}" --natpf1 "ssh,tcp,,2222,,22"
Let's start the VM in the background with headless mode (without the VM window) using the following command. Then, we'll be able to access it through SSH. If you don't have an SSH client, don't use the --type "headless" parameter.
VBoxManage startvm "${VBOX_VM_NAME}" --type "headless"
To turn off the VM, you can use the poweroff command from the guest OS. But we can also do it from the outside, using the VBoxManage acpipowerbutton command. Below is the official documentation of the command, and next is an example of how you can use it.
Sends an ACPI shutdown signal to the VM, as if the power button on a real computer had been pressed. So long as the VM is running a fairly modern guest operating system providing ACPI support, this should trigger a proper shutdown mechanism from within the VM.
VBoxManage controlvm "${VBOX_VM_NAME}" acpipowerbutton
But if the VM doesn't respond to any command, you always have the option to forcefully turn it off with the VBoxManage poweroff command. Below is the official documentation of the command, and next is an example of how you can use it.
Has the same effect on a virtual machine as pulling the power cable on a real computer. The state of the VM is not saved beforehand, and data may be lost. This is equivalent to selecting the Close item in the Machine menu of the GUI, or clicking the VM window's close button, and then selecting Power Off the Machine in the displayed dialog.
VBoxManage controlvm "${VBOX_VM_NAME}" poweroff
Host-Only Network
Port forwarding is a nice feature when we need to share one or two services from the guest to the host, like SSH and a web server. But as soon as we need to share more services or access the host from the guest, port forwarding isn't going to be enough. In this section, we're going to see how to create a network just between the host and the guest, so we can achieve this goal.
I'm going to start by explaining how to create this network through the GUI. Then, I'll repeat the same steps, but using the CLI. Before any networking change, make sure that the virtual machine is powered off.
Graphic User Interface
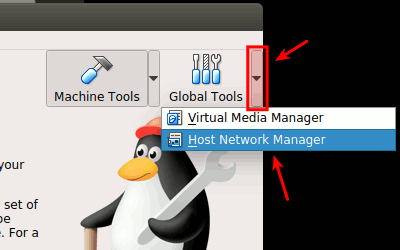
The first thing we need to do is to create a virtual network interface. To do this, go to the "Host Network Manager" under "Global Tools".
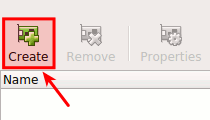
Once you're there, click the "Create" button to create the virtual network interface.
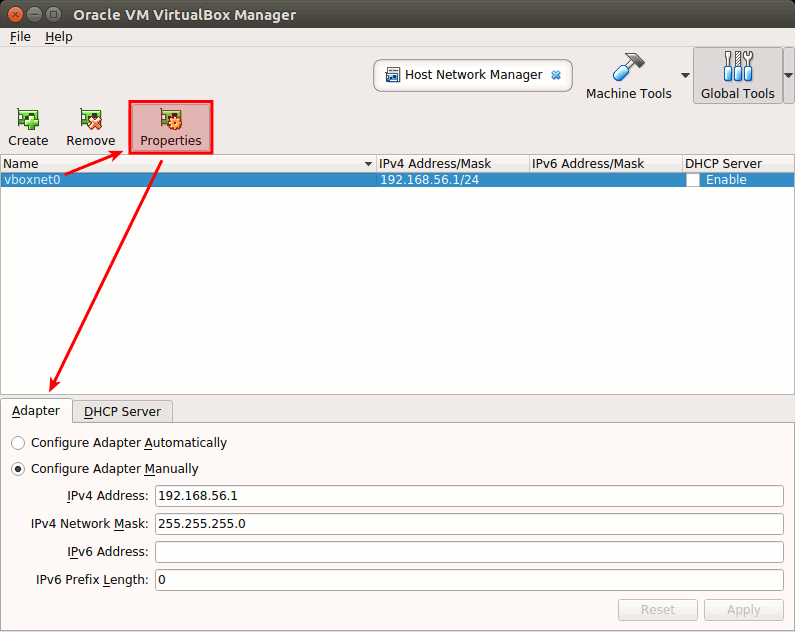
Then, select the newly created virtual network interface and click the "Properties" button. Leave the default options. As in the following picture, I'm assuming that you have the option "Configure Adapter Manually" already selected and that the host's "IPV4 Address" is 192.168.56.1.
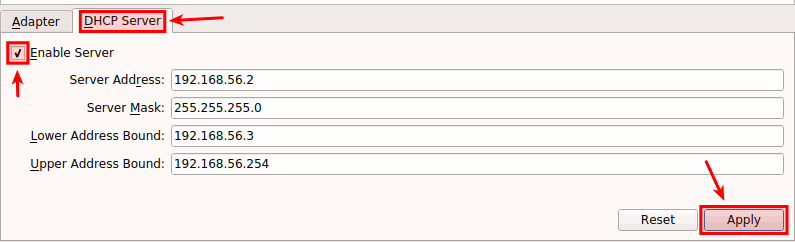
Click on the "DHCP Server" tab and click the checkbox to enable the server. As in the previous tab, leave all settings by default. Here, you'll see the server IP, server mask, lower and upper addresses that will be assigned. Because we're going to have just one virtual machine running, our guest OS will get the lowest (first) IP from this range, which is 192.168.56.3.
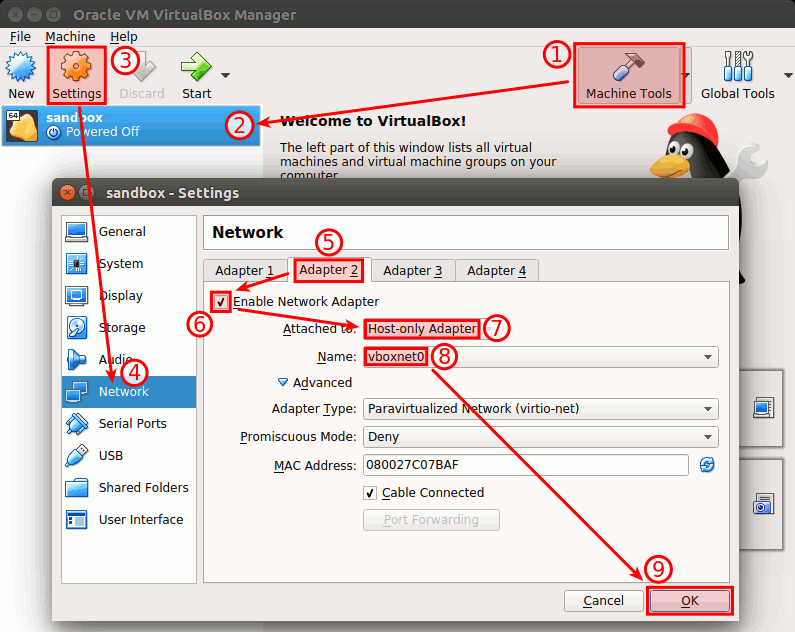
Now, go back to the list of virtual machines by clicking the "Machine Tools" button. Make sure our sandbox VM is selected and click the "Settings" button. Under the settings pop-up window, select the "Network" section and click the "Adapter 2" tab. This is the new adapter that we're going to enable. To do this, click the "Enable Network Adapter" checkbox and attach it to "Host-only Adapter". In the "Name" select list, we need to ensure that the newly created virtual network interface is selected. Then, save the changes by clicking the "OK" button.
Let's check that our latest changes are working fine. The first thing that we're going to do is check if the new network device appears in the guest OS. Start the VM, log in, and then run the following command.
ip link | grep '^[0-9]:' | grep -v -E ' (lo|docker)' | cut -d' ' -f2
In the output of the previous command, you should see a list of network devices. At least you should see two: one for the NAT device and the other for the newly created host-only device. Below is an example, but keep in mind that the names can be different.
enp0s3:
enp0s8:
From the previous list, we need to see if the latest device has been set up. I'm assuming that the first device (NAT) is already working as expected. For this, run the following command.
ip address | grep 'inet ' | grep -v -E '(127.0.0.1|docker)' | sed 's/^\s*//g'
The output of the previous command should be similar to the next one.
inet 10.0.2.15/24 brd 10.0.2.255 scope global dynamic noprefixroute enp0s3
inet 192.168.56.3/24 brd 192.168.56.255 scope global dynamic noprefixroute enp0s8
By default, Debian will set up the new device automatically, but Alpine won't. In Alpine, you would see just one device in the previous list (the NAT device). I'm going to show two ways to set up the new network device. The first one is by running the setup-interfaces command. Keep in mind that this script will ask you to configure all network devices, not just the new one. To set up the devices, run the following command.
sudo setup-interfaces
Another way to manually set up the new network device is by editing the /etc/network/interfaces file. Below is a command that will copy the same configuration from the NAT device to the host-only device.
echo -e "\n$(cat /etc/network/interfaces | grep eth0 | sed 's/0/1/g')" | sudo tee -a /etc/network/interfaces
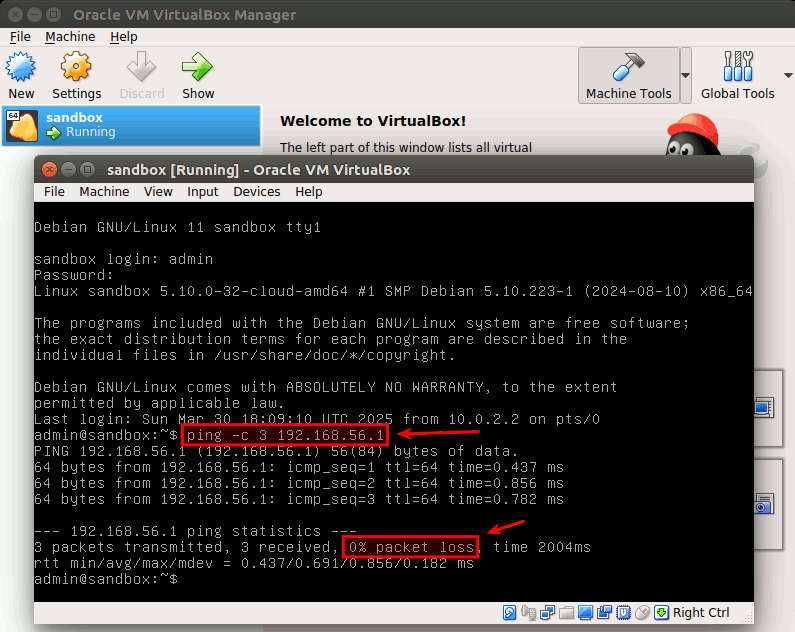
Once we've verified that the new host-only network device is up and has the IP address assigned by the DHCP server, we can confirm that everything is working okay by running the ping command. With this command, we're checking if we can reach our host machine (192.168.56.1) from the guest OS.
ping -c 3 192.168.56.1
Below is an image as an example of how the previous command should look.
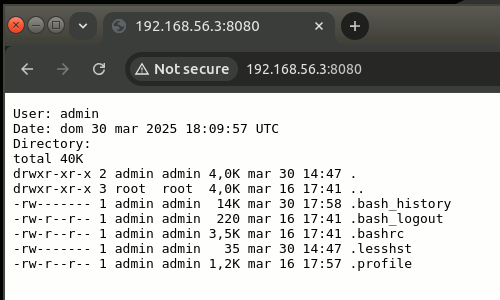
Let's try the other way around. But this time, instead of pinging the guest from the host (which, of course, you could do), we're going to run a dummy HTTP server in the guest OS (192.168.56.3), and then we're going to reach it using a web browser from the host machine. Below is the code that you need to run in the guest OS. It's a simple script that serves HTTP content using netcat through port 8080 and will stop running after the first (packet of the) request. In Alpine Linux, remove the -W 1 parameter.
echo -e "HTTP/1.1 200 OK\r\n\r\nUser: $(whoami)\nDate: $(date)\nDirectory:\n$(ls -lha)" | nc -W 1 -l -p 8080
Now, go to the web browser, type 192.168.56.3:8080 in the address bar, click Enter, and you should see something similar to the following image.
Command Line Interface
Here, we're going to replicate what we did in the previous section, but using only the CLI. Let's start by creating a host-only virtual interface with the following command.
VBoxManage hostonlyif create
After it finishes creating the interface, you should see an output similar to Interface 'vboxnet0' was successfully created, where the number might be different depending on whether there are other interfaces already created. From now on, I'm going to assume that the interface that we want to use is the newest one. Please adjust the commands if needed. Below is a command to list all the host-only interfaces.
VBoxManage list hostonlyifs
On my machine, the output looked like below.
Name:            vboxnet0
GUID:            786f6276-656e-4074-8000-0a0027000000
DHCP:            Disabled
IPAddress:       192.168.56.1
NetworkMask:     255.255.255.0
IPV6Address:
IPV6NetworkMaskPrefixLength: 0
HardwareAddress: 0a:00:27:00:00:00
MediumType:      Ethernet
Wireless:        No
Status:          Down
VBoxNetworkName: HostInterfaceNetworking-vboxnet0
I'm going to save the interface's name in an environment variable, using the following command.
VBOX_IF_NET="$(VBoxManage list hostonlyifs | grep "^Name" | cut -d':' -f2 | sort | tail -n1 | xargs)"
Running the following command and using the previous environment variable, we can get the "IP Address" that has been automatically set to the virtual network interface.
VBOX_IF_IP4="$(VBoxManage list hostonlyifs | sed -E -e 's/\s+/ /g' -e 's/(\w)$/\1,/g' | perl -p -e 's/,\n/,/' | grep "${VBOX_IF_NET}" | grep -o -P 'IPAddress:\s+[\d\.]+' | cut -d' ' -f2)"
Then, we can enable the "DHCP Server" with the following command.
VBoxManage dhcpserver add \
    --ifname "${VBOX_IF_NET}" \
    --ip "${VBOX_IF_IP4%.*}.2" \
    --netmask "255.255.255.0" \
    --lowerip "${VBOX_IF_IP4%.*}.3" \
    --upperip "${VBOX_IF_IP4%.*}.10" \
    --enable
Finally, we assign the newly created virtual interface to our virtual machine using the command below.
VBoxManage modifyvm "${VBOX_VM_NAME}" \
    --nic2 "hostonly" \
    --nictype2 "virtio" \
    --hostonlyadapter2 "${VBOX_IF_NET}"
Now, it's time to test if the previous changes are working as expected. I'm going to start the virtual machine using headless mode.
VBoxManage startvm "${VBOX_VM_NAME}" --type "headless"
Next, log in to the VM with SSH and confirm if the new host-only network device is up and running. How to do it is in the previous GUI section. Then, execute the following command, which is a variation of the one that we ran in the GUI section. This one is also a dummy HTTP server, but it's going to stay alive and return dynamic content on every request made to port 8080. This script has a variable that counts all the times that it receives a request, and its value is returned in the response. Remember to remove the -W 1 parameter in Alpine Linux.
i=0; while true; do i=$((i+1)); echo -e "HTTP/1.1 200 OK\r\n\r\nREQUEST #${i}" | nc -W 1 -l -p 8080; done
Open another terminal on your host machine and run the following command to do an HTTP request to our guest OS (192.168.56.3) through port 8080. You'll see that every time you run the command, the number that appears in the response will be incremented.
curl 192.168.56.3:8080
Wrapping Up
In this post, we explored how to run pre-built Debian and Alpine images using VirtualBox. VirtualBox offers a user-friendly interface and cross-platform availability, making it an excellent choice for managing these VMs. I hope you found this guide helpful.
Take care and until next time!